


2. General
Inputs for this type of system are always done at the Plant level of the Building Tree in the DWH tab. Inputs depend upon the Occupancy you are working on.
Single Family: You will input the Solar Savings Fraction for the Solar System directly. This number will come from the Solar designer for the System.
Multifamily: You will input the specifications for the system including the specific Solar Panel Brand and Model, how many panels, as well as the solar storage tank specifics and the panel tilt and orientation. Note in this case you DO NOT get the option of inputting the Solar Savings Fraction, a fully designed system is required.
Nonresidential: There is no credit recognized in the Energy Code for this occupancy type.
At the top level of the Building Tree, in the PV+Batt tab, we offer the option to input a Battery Storage System, however there is one important restrictions on the use of this feature as follows:
- Battery storage and PV are only recognized for New Construction projects, not for Additions and/or Alterations.
When inputting the Battery system, you will need to indicate the size of the battery, as well as the strategy used to charge the battery. In most cases this will be the Basic charging selection. In addition, you will need to indicate the efficiency of the system used to charge the battery as well as to discharge the battery.
At the Zone level of the Building tree, under the selection for Building Story, you have added a Multiplier (2, 3 etc) to this entry which multiplies the entire Zone and everything in it.
To fix this, click on the Zone in the Building Tree, click the entry for Story and change the Number of Duplicate Stories to 1.
Navigate to the DHW/Boiler library and create a new Water Heater. Set the Water Heater Type to “Heat Pump”. Enter the Volume, Uniform Energy Factor and Input Rate from the manufacturer’s specifications. Note that sometimes the Uniform Energy Factor may be listed as the COP in the data.
For residential projects (single family, multifamily, hotel/motel), you may select a model that has been tested by the Northwest Energy Efficiency Alliance (NEEA) by clicking on the “Select NEEA HP” button on the dialog. Note that for NEEA rated models, the efficiency is not relevant since the NEEA selections contain performance curves specific to that model. Also, the list of water heaters shown is provided by the CEC, we have NO control over that listing. If you cannot find your model in that list, you can input the UEF and size rating for the unit.
Note that you cannot use a Tank Style Heat Pump Water Heater as the heating source for the home. In this circumstance, the CEC requires you to model this as Electric Heat. You cannot input the Heat Pump Water Heater as ANY source of hot water for either a Hydronic Heating System, nor for a Combined Hydronic Heating System. You will need to model this as electric heat.
As of EnergyPro v6, the energy budget for your building is set internally by the CEC supplied compliance engine (CBECC). As such, we do not have control or access to that feature so any questions on the energy budget should be directed to the CEC hotline at (800) 772-3300. The CEC publishes a document called the Alternative Calculation Method (ACM) manual, you can Google this and take a look at this document. Also, some of the training classes on the code will give you insight into that, and in the case of the Residential buildings, the Prescriptive Packages in Standards Section 150.1 would be your starting point. For Nonresidential lighting and envelope, the Prescriptive section of the Standards would also be a good starting point, but the HVAC is detailed in the ACM manual. Look in the EnergyPro Help for some information on those tables also.
You can edit the specs on an existing system or assembly from the libraries in EnergyPro or you can use the “Add new” button to create your own.
1. The EnergyPro libraries come pre-populated with most of the common utility rates in California.
2. Select an electric/gas utility rate at the Building level of the Tree, Utility tab. Note when selecting one you can use the green Import button to pick from a list.
3. Go to Calculations and check the box for the particular calculations you wish to run.
4. Calculate.
5. In the Report Wizard, Select the report labeled “ECON-1”, and proceed to finish.
6. Click the Print Preview button.
Under Help | EnergyPro News, we have a news feed that will alert you automatically to any new updates published for the software.
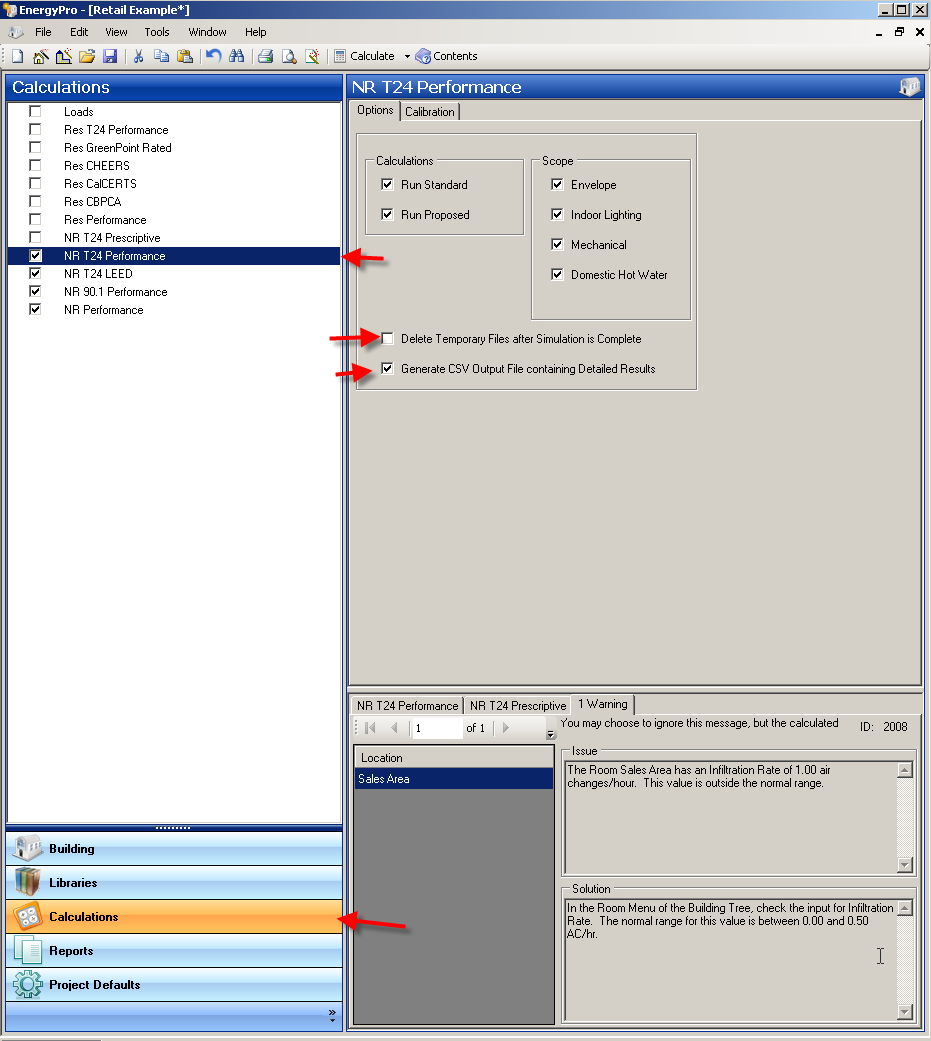
To create hourly output files in a CSV format (readable by Excel), you need to go to the calculations button on the bottom left, and then select whichever calculation you are working on (NR Title 24 Performance, NR ASHRAE 90.1, etc.) in the list above. Deselect ‘Delete Temporary Files after Simulation is Complete’ and then select ‘Generate CSV Output File Containing Detailed Results’ as shown in the screenshot below. Now run the calculations and the CSV file will be found in the Results folder located under My Documents/ EnergyPro 7/ Results. See screenshot below.
The best way to create your own utility rate is to edit one of the utility rates that are already in the list. You will have to get the information from the utility company on their actual costs.
We recommend that you select the closest city, in the same Climate Zone as your location. As a general rule, you will find a location within a few miles in our list.
Inputs for PV are handled at the Top level of the Building Tree, in the PV+Batt tab.
In New Construction, Title 24 recognizes (and generally requires in order to comply) your inputs for PV, however in no case does the credit get recognized in additions and alterations. You have several options on how the PV is sized:
One approach is the Specify your PV Size. When using this option, you will input the specifics of your PV in the table at the bottom. This is the ONLY option for Multifamily and Nonresidential occupancies.
(The following options do not apply to Multifamily and Nonresidential occupancies)
Another option is to select a Standard Size PV system. Using this option, EnergyPro will size your PV system pretty close to what is used in the Budget.
A third option is to Maximize the PV size. EnergyPro will size the PV system as large as possible.
Note that several Title 24 based exceptions are available related to PV in this tab. Please see the Energy Code for more info,
Click on the red “X” to the left of the entry. Select Yes when asked to confirm the deletion. Your input will show Undefined. (Note: this operation will not delete the item from the library.)
When a new window is created in EnergyPro it is created specific to your file, meaning that the item will only appear in the file being modified. Once inside the Fenestration Library select the window that you have customized and click on the Export button. The program will ask you to select a destination, by selecting the Default Library and mouse clicking the OK option, the window you have created will now be added to the Default Library. Any new projects that you start will automatically include the contents of the Default Library. However, the window you just created will not appear in an other projects that have already been created.
This window can be exported to an older project by exporting from the default library to the older project file. The default libraries can be accessed under Tools | Default Libraries.
You will have to input an interior window as an interior door in an interior surface (wall).
A user may combine systems or any input for that matter that are identical and whose requirements do not mandate that detailed inputs be used. When combining inputs, be sure to keep track of the multipliers and that your floor levels are being reported correctly. The criteria in this case would be that the systems serve zones that are thermally identical. An example of this would be a core zone of a building. Five different orientations would not meet this criteria. Consult the CEC’s Residential and Nonresidential Manual for information on the depth of detailed information that may be required for the situation in question.
EnergyPro requires that you input your heat pump heating capacity at the AHRI rating condition of 47 degrees F dry-bulb. Typically, design conditions at your actual site are much colder, so EnergyPro will de-rate the heat pump capacity, based upon this condition.
EnergyPro requires that you input your air conditioner cooling capacity at the AHRI rating condition of 95 degrees F dry-bulb outside air, 67 degrees F wet-bulb entering air. Typically, design conditions for your building will be different. Changes in outside design conditions and indoor entering air conditions will result in a different overall capacity for your system than the value you specified in the library.
The latest version of EnergyPro can read version 8 and newer files. Files from V7 and older should be loaded and saved in version 8 then read into the newest version.