


9a. LEED
LEED refers to this as a District Energy System (DES). You should begin by reading the DES Guidance from USGBC.
Once you have decided which option from the guidelines you will use, follow these instructions:
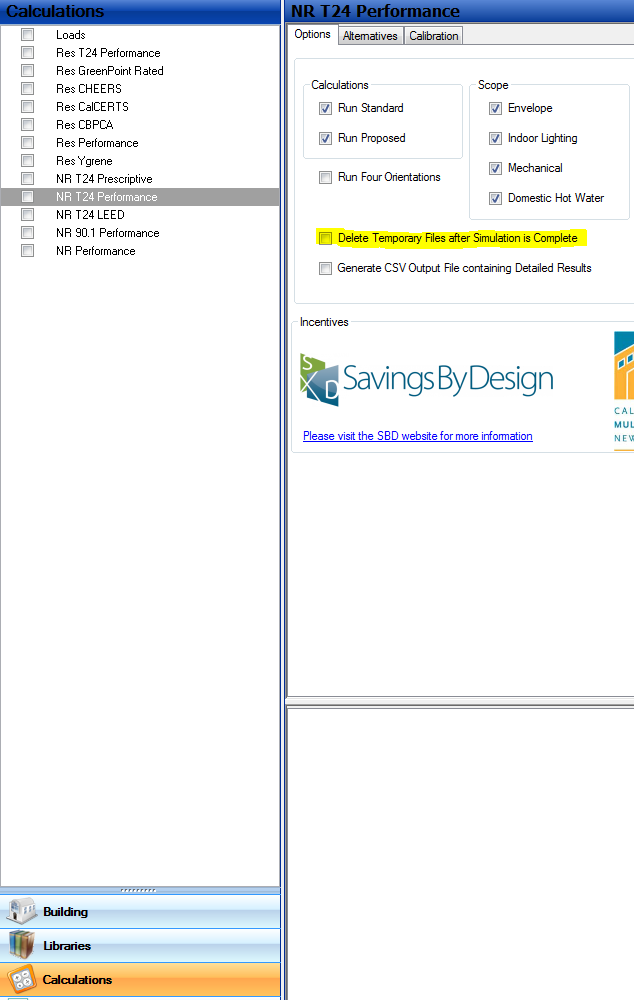
Option 1 – This approach requires you to treat the plant chilled water and hot water as purchased commodities thus removing any efficiency associated with the central plant from the model. You will model your HVAC systems as normal and input whatever central plant is appropriate for the chillers, boilers, towers and pumps (you will be discarding all of these numbers so it is not important). When running the calculations, under the Calculation Options, check the box for CSV reporting (covered in another FAQ) and uncheck Delete Temporary Files. Now you can run the calculations.
After the calculations are complete, you will open the CSV file in Excel and you will find hourly data for the various end uses (note the units of each column). The columns for Heating, Cooling, Heat Rejection and Pumps* can be discarded. On the far right you will find columns for Chilled Water and Hot Water demand for the building. These are the purchased commodities you will use to follow the DES guidelines. Any columns that represent normal building usage (lighting, fans, receptacle) should get multiplied times the virtual rate for Gas or Electricity (found on the EAC1 report). The Chilled Water and Hot Water use is multiplied times the rates given in the DES Guidance and you will have a spreadsheet that documents total energy cost for your building.
In some cases, the Baseline building may not be a chilled water system so EnergyPro will configure a baseline with DX equipment. In this case, you can force EnergyPro to use a chilled water system by changing one of the Zones to a Floor Number of 5 and it will structure the baseline as chilled water.
Option 2 – With this option you are allowed to model the actual efficiencies of the central plant in EnergyPro only you will scale the actual equipment according to the load served. Be sure you understand the documentation requirements given in the DES Guidance document from USGBC since this approach requires supporting data on the efficiencies you are using.
*If you have only pumps as part of the CUP, discard the pump number from the calculation since it is part of the purchased commodity. However, if you have local pumps at the building, model those and include them in the building energy usage numbers.
They are just warnings, if you feel your inputs are set properly then it is fine to ignore them. EnergyPro sets standards for these inputs and gives you a warning if anything is more than 30% outside of that range.
Below is a list of tabs in which you need to enter information for a non-residential LEED calculation. You will not need to enter every available input in each tab.
Building icon:
Project Design Data, Project Title, Designer, Lighting Designer (if lighting is part of your scope), Mechanical Designer (if Mechanical is part of your scope), Outdoor (if outdoor lighting is in your scope), Utility
Plant Icon:
Heating Hot Water (if you have a boiler for space heating which is separate from the domestic hot water heater), Chiller Water (if you have a built up HVAC system with a chiller) Hydronic (if you have a ground coupled system) Domestic Hot Water (unless DHW is not in the scope), Renewables, Exceptional
System Icon:
![]()
General, Distribution
Zone Icon:
![]()
General, Lighting, Mechanical (if you have zonal mechanical boxes or wish to adjust the ventilation), schedules
Room Icon:
![]()
General, Infiltration, Occupant, Receptacle/Process, exhaust fan, lighting (if you are taking task or daylighting credits).
Within the Room icon, you will enter building assemblies such as Roofs, Walls and floors by right clicking on the room icon and selecting Add …
The SS-Z documentation is reporting the VRF system performance only. This is how DOE-2 reports the outside operation and system performance of VRF systems.
The PS-D reports the Total Plant Loads for the entire project as compared to the reporting of the VRF system only as found on the SS-Z report.
Most utility rates are either tiered (residential) or time of use (commercial). As a result, different charges will occur depending upon when your building is using energy, as well as how much it uses. Energy usage in the higher tiers tends to be more expensive, as is the energy usage during peak periods. Unless the baseline building and your building have exactly the same load profiles, the virtual rate is going to vary. In addition, many rates carry a base monthly meter charge that can be substantial and is included in the overall rate.
At the Top level of the Building Tree, Utility Tab, you will find selections for all of the available DOE-2 reports. Select them as necessary but be careful, if you select too many, DOE-2 will not run since it is more reports than it can handle.
Now, go into the Calculation Options, select your desired calculation and on the right side of the screen, deselect “Delete Temporary files”
See Screen Shot below.
Once you do this, rerun the calculations so the reports will be generated
Now, go to the Report selections in EnergyPro and choose the Proposed (or Standard) DOE-2 report selections in the list of reports and hit print.
Also you can go to My Documents\EnergyPro 7\Results\ProjectName and you will see the files with the .SIM extension, these will contain the same reports.
Interior surfaces are surfaces between two spaces and can be either walls, ceilings or floors. Note that interior walls can also contain doors. If you have an interior window, treat it as an interior door in an interior wall. Insert an interior surface in the room and set it adjacent to the other room. If you do not set it adjacent to another room, or you set it adjacent to itself, it is treated as adiabatic.
The top occupancy box titled ‘Occupancy’ is for general use. The lower box titled ’90.1 Ltg Occupancy’ is for lighting calculations based on ASHRAE 90.1. If you are not doing a an ASHRAE 90.1 calculation then you do not need to make any selection in the lower box.